Addressfinder integration instructions for external HubSpot forms
The Addressfinder HubSpot address verification external form embed adds a predictive autocomplete to the address fields within your externally hosted HubSpot forms.
For an overview of this integration, visit the HubSpot integration page.
To add Addressfinder to a HubSpot hosted form, follow the integration instructions for HubSpot forms
These instructions will show you how to add the Addressfinder autocomplete to an externally hosted Hubspot form. Your form should already be working well - just with manual address entry. We will enhance this form to integrate the Addressfinder widget, and enable autocompletion of verified addresses.
These instructions can also be used for integrating the email and phone verification widgets into your form, example of how this looks.
Before you start
Before adding address autocompletion to your externally hosted HubSpot form, you’ll need to have the following:
- An existing Hubspot form, embedded on a web page.
- The form should already have the following address elements:
a. Street
b. Suburb
c. City
d. Region (optional)
e. Postcode
f. Country (optional) - You’ll need an Addressfinder licence key - signup for a trial account.
- Sufficient Hubspot access to edit the settings for website pages. You’ll need edit and publish permissions.
If your form has a different configuration of address fields, the widget can still be used on these. View the code examples below for custom address, email or phone number fields in the alternative options.
Step by step
1. Getting started
- Log into Hubspot
- In the menu, navigate to Marketing > Lead Capture > Forms
- Hover over a form and click Actions > Share. Alternatively, open the form and click Embed
- Paste the embed code into the HTML module on your external page For more information, see the Hubspot instructions
2. Taking note of the form field property names
-
Click on the correct form in Marketing > Lead Capture > Forms
-
Click on Edit Form, to see a panel such as this. Click the pencil icon next to each element
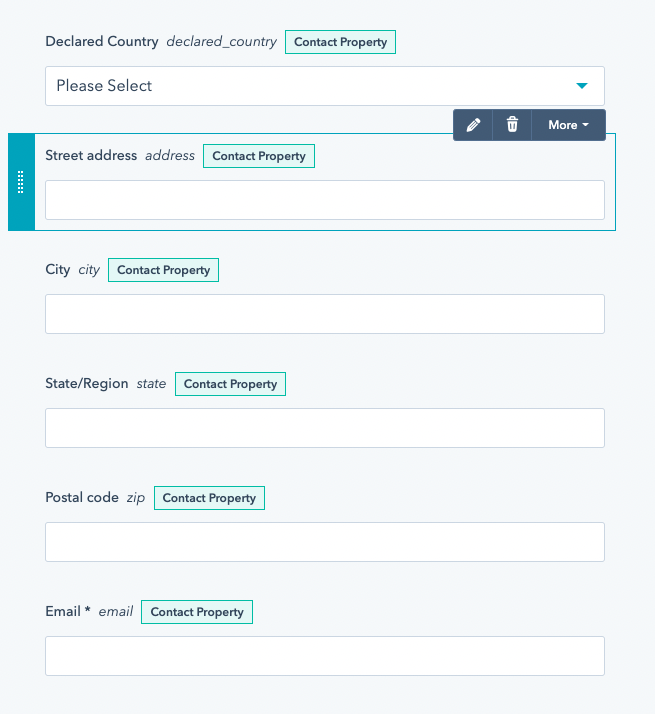
-
This will reveal the property name of each field.
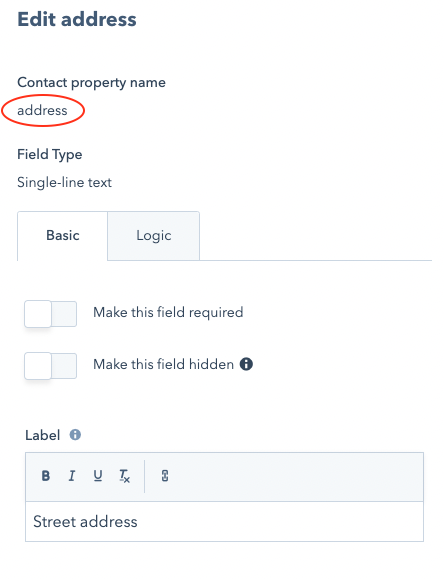
-
Write down each property name like the FORM CONFIG table below:
| Field label | Property name |
|---|---|
| Street address | address |
| Suburb | suburb |
| City | city |
| Region(optional) | state |
| Post code | zip |
| Country (optional) | country |
3. Preparing the code
- The HubSpot external embed instruction will lead you to include a Hubspot Javascript snippet in your page.
- You will need to add the Addressfinder widget configuration to this code.
- Paste the following Addressfinder config into your hubspot form embed javascript (keeping your own values for the region, portalId and formId).
<script>
  hbspt.forms.create({
    region: "na1",
    portalId: "00000000",
    formId: "11111111-2222-3333-4444-555555555",
    onFormReady: function(form) {
      // **************************************************
      // Addressfinder plugin for Hubspot
      // **************************************************

      // STEP BY STEP integration instructions here:
      // https://addressfinder.com/nz/r/docs/plugins/hubspot-external-embed/
      form = Array.isArray(form) ? form[0] : form;

      var config = {
        // STEP 1: paste in your licence key
        licenceKey: 'ADDRESSFINDER_DEMO_KEY',

        defaultCountryCode: 'NZ',

        // STEP 2 - update the property names using the values assigned within your Hubspot form
        addressPropertyName: 'address',
        suburbPropertyName: 'suburb',
        cityPropertyName: 'city',
        statePropertyName: null, // region (optional)
        postCodePropertyName: 'zip',
        countryPropertyName: null, // optional (will use defaultCountryCode if not present)

        // STEP 3 (optional): customise the addresses returned by updating the address_params values
        // Examples at: https://addressfinder.com/nz/docs//docs/address-widget/code-generator
        widgetOptions: {
          AU: {
            address_params: {}
          },
          NZ: {
            address_params: {
              delivered: '1'
            }
          },
          INT: {
            address_params: {}
          }
        },

        // STEP 4: once the plugin is working, you can set debugMode to false
        debugMode: true
      };

      if(form.querySelector(`input[name=${config.addressPropertyName}]`)){var e=document.createElement("script");e.src="https://api.addressfinder.io/assets/hubspot/v2/address.js",e.async=!0,e.autoLoadConfig=config,form.appendChild(e)}
    }
  });
</script>
- At the top of this code, replace the ADDRESSFINDER_DEMO_KEY with your licence key. You can get this key from the Addressfinder Portal after you’ve signed up.
- Next, update the property names using the table you created (above).
- (optional) You may tweak the
address_paramsvalues. Use the output from the code generator to tune your addresses for allowed addresses such as PO Boxes, etc. - That’s all
4. Publish and test
- Wait 30 seconds, reload your page (where the form embed code has been added).
- The autocomplete popup should display once you start typing into the address field.
- Selecting an address should see the individual elements being populated into the appropriate fields.
5. Troubleshooting
If you still have the debugMode enabled, then you can view error messages within your browser's Javascript console.
The most likely problem is a mis-configuration of the property names. The code above will give you a useful error message if it is unable to find the correct field.
If this happens, you should double-check the values you wrote down in the FORM CONFIG table above. Have these values been copied into the code correctly?
Still having trouble? Send us an email, and we will have a look. Be sure to include the URL of the page, so we can debug the problem.
Alternative options
The above instructions can also be applied when integrating with Addressfinder's email or phone verification widgets. You can also use the address widget to collect verified addresses into a variety of different address field configurations.
To make use of an alternative option, follow the above instructions but substitute the code from one of the examples below in place the code supplied in step 1.3. Note, some examples make use of field types (e.g. input[type=email]) or field names (e.g. input[name=phone]) instead of field IDs.
- Phone verification widget integration into a HubSpot form: View on CodePen
- Email verification widget integration into a HubSpot form: View on CodePen
- Address verification widget integration into a HubSpot form (single address field): View on CodePen
- Address verification widget integration into a HubSpot form (four address fields): View on CodePen
- Address verification widget integration into a HubSpot form (five address fields): View on CodePen
- Address, Email and Phone verification widgets integrated into a HubSpot form: View on CodePen
- Address with multi-country select: View on CodePen
To get a license key, sign up for a 30-day free trial.
Already have a subscription? Find your key in the Credentials section in the Portal.